A couple of folks want to know if I make the cards completely by myself or if I buy a simple premade card and just add final touches. I can assure you that other than buying card stock, stamped images, and some dies, I put the cards together myself, including cutting out or die-cutting the card design itself. The process is usually to cut the card stock to the size I want, stamp with whatever design I have in my mind, color, watercolor, or paint the stamped images, make a background, cut out the images and any other bits I want to add to the card, stamp the sentiments, emboss if desired, and add some embellishments.
Here are my first couple of cards.
This one went to my father's significant other, Shirley. I wanted to make her a thank you card because she sent me this awesome watering can garden decoration. She made it herself!
Here's the thank you card.
Card front. I used a die that made a little pop-out card that has a front which lifts to see the inside. I used an antique tan card stock. This was before I acquired some nice markers to color my designs.
Card interior. I used some distress inks to color the background behind my interior stamp and sentiment. I used a combination between brown, gray, and silver ink. Spoiler for the future - I absolutely LOVE coffee and tea cards.
This next one I gave to my wonderful husband just because I wanted to. I also couldn't resist the stamp set.
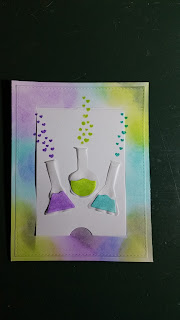
Card front. I used the same die as above to make this card. This time I used distress inks to color the outside border and left the interior white. I used vellum to cut out the little flasks and beakers and put colored paper over the area of the bottle that holds liquid. I used little heart stamps as bubbles coming from the beakers. The only thing that didn't turn out as intended was that the vellum crimped up a bit instead of lying flat. I could only adhere the flasks to the card behind the paper 'liquid' so that the adhesive wouldn't show through the vellum.
Card interior. Leaving the inside white left a lot of space to put my sentiment, a little chemistry design, and more hearts. Nice and simple.
So anyway, this was the beginning of my card making obsession. I'll put more of the cards I've made up soon. I'll also try and put cards up as I make them in the future. Hopefully you'll get to see some improvement and a little bit more creativity. If nothing else, I've been having a lot of fun and the people I've sent cards to seem to appreciate them. Either that or they're just not hurting my feelings. :)


I love your cards and I've been so blessed to be a recipient. Since my time management skills lack, sending a proper response has been very untimely. You are so talented lady, soaps, cards, oils, and that beautiful brain.
ReplyDeleteOh my gosh, these are so cute! I especially love the coffee themed card! If you make a handful of them for me I will buy them so I can mail out to my sis & family!
ReplyDeleteHaha I've never thought about mass producing them. I'm still getting the hang of making them. I'm so glad you like my cards!
Delete